|
|
|
Dot's Miscellaneary
Stopping False Machine Error Messages when Using Metallic Threads (Sep 10, 1999)
DIY Thread Rack (Sep 10, 1999)
Controlling Bobbin Storage Tangles (Sep 26, 1999)
Snipping Jump Threads (Dec 7, 1999)
I had all sorts of troubles when I started using metallic threads, my Brother 2100 (8500) kept stopping and telling me to check my top thread. I did as I was told but it seemed OK to me. I tried changing tension, but still the same result. In desperation, I consulted "he who runs the computer" who suggested adding a bit of tension before the thread got to the machine by running the thread through my fingers. This seemed to fix the problem. Only trouble was that I could see myself anchored to the machine all day, and dying of thirst and starvation. Next thought was to run the thread through the guide in the thread stand, up and over the curtain rail about 4 feet above my head, then back down through the thread stand guide once again then to the machine as normal.
By Magical Mystery means, IT WORKED, sewed away for hours without a glitch.
So, If you too are having similar problems, give it a try, you'll never know until you do. If you dont have a handy curtain rail, you could try screwing a cup hook into the wall somewhere up by the ceiling and running your thread over that.
Do It Yourself Wall
Mounting Thread Rack.
If you (or someone you know well), has an angle grinder, then
here is a simple thread rack that you can make. You can make it in various
sizes to fit whatever wall space you have free, you can even have it shaped
to fit around other things that might be hanging on your wall.
You will need a piece of weld mesh, you can
probably get this from a garden supplier, hardware shop or builder supplier.
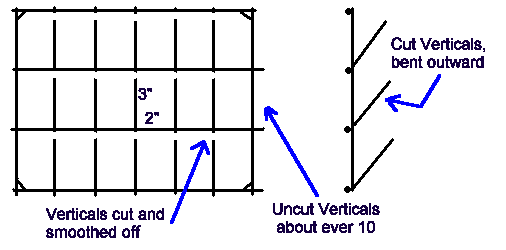
The mesh size that you will need is 3" x 2" x 5/32"
(75 x 50 x 4 mm). The overall size will depend on your available wall space.
To make the rack, using the angle grinder with a metal cutting blade, cut the mesh at one end (this will become the top) of each of the 3" parts, leaving an uncut frame around the entire piece and also an uncut vertical about every 10 verticals. (see the diagram). Bend out each cut piece so that it sticks out about an inch at the top. Use the angle grinder to remove any rough edges of the mesh.
Paint, or (if you,ve got lots of money,) powder
coat your rack. Secure it to the wall with cup hooks suitably located so
as to hook under the top rail or use screws with large washers, screwed
into the wall at locations just inside each corner of your rack.
(If you want to be real fancy, and you have a welder; before painting,
you can weld washers onto the rack, these will act as screwing points )
You can make a bobbin rack by using the same technique but using smaller
mesh.
How many times do you open your bobbin drawer and go to take out one pre-loaded with the colour you must use right now, only to find that the gremlins have been visiting and half your bobbins have unravelled into one huge bunch of grapes.
Well - your troubles are over. Here a little D IY gizmo that you can make for almost nothing that will stop the thread from unravelling from your bobbins.
Go to the nearest hardware store and buy about 1/2 - 1 metre (or yard) of clear beverage tubing, 12mm (1/2") inside diameter. Slice it along its length and then cut it into pieces 5mm (a bit under 1/4"). You will now have lots of little tube sections, all split across.
Slip a piece over your bobbin. It will retain its shape and hold the thread
Problem solved
Ever looked a the thumnail of a design and said to yourself, " Look at all those zillions of jump threads in the outline"
There can be many causes of loads of jumps, among them "ametuer" digitising techniques , semi automatic digitising direct from a Bitmap, lots of unconnected outline areas, some resizing and editing software seems to create jumps where they didn't exist before the edit.
One of the problems with removing all the jumps is that where the jumps are small, there is a good chance that you will cut the underlying stitching while you are trying to snip out the jumps.
One way to avoid this is to stop the sewing immediately before the outline stage and place a piece of water soluble stabiliser (solvy or similar) over the sewn out parts. Then re-start your sewing so that the outline stage is seperated from the remainder by the layer of water soluble stabiliser.
When you come to snip out the outline jumps, the layer of stabiliser will prevent you from catching your snips in the underlying stitching
The stabiliser will wash away as per normal
Thats it for now, more later
|
|
|
|
|
|
|
|